Juno LED Under Cabinet Lighting
Juno LED under cabinet lighting is a popular choice for homeowners looking to enhance the functionality and aesthetics of their kitchens, bathrooms, and other areas. This type of lighting offers a range of benefits, from improved task lighting to energy efficiency and a modern, stylish look.
Benefits of Juno LED Under Cabinet Lighting
Juno LED under cabinet lighting provides several advantages over traditional incandescent or fluorescent lighting.
- Energy Efficiency: LED lights consume significantly less energy than traditional bulbs, leading to lower electricity bills and a reduced environmental impact.
- Long Lifespan: LED lights are known for their long lifespan, lasting up to 50,000 hours, significantly longer than incandescent or fluorescent bulbs. This means fewer replacements and less hassle.
- Improved Task Lighting: Under cabinet lighting provides focused illumination on countertops and workspaces, making tasks like cooking, preparing food, or applying makeup easier and more comfortable.
- Enhanced Aesthetics: LED under cabinet lighting adds a modern and stylish touch to any space, enhancing the overall ambiance and creating a more inviting atmosphere.
Features of Juno LED Under Cabinet Lighting
Juno LED under cabinet lighting offers a variety of features to meet different needs and preferences.
- Brightness: Juno LED under cabinet lights come in various brightness levels, measured in lumens. Higher lumen outputs provide brighter illumination, while lower lumen outputs offer a softer, more ambient glow.
- Color Temperature: LED lights emit different color temperatures, measured in Kelvin (K). Warmer color temperatures (2700K-3000K) produce a yellowish light, while cooler color temperatures (4000K-6500K) emit a whiter, more daylight-like light.
- Dimming Options: Many Juno LED under cabinet lights offer dimming capabilities, allowing you to adjust the brightness level to suit your needs and preferences. Some models even come with remote control options for easy dimming.
Types of Juno LED Under Cabinet Lighting
Juno LED under cabinet lighting is available in various configurations to suit different installation needs and preferences.
- Direct Wire: Direct wire under cabinet lights are hardwired directly to the electrical system, providing a permanent and reliable lighting solution. They are typically used in new construction or major renovations.
- Plug-in: Plug-in under cabinet lights offer a more convenient installation option, as they simply plug into a standard electrical outlet. This makes them ideal for renters or homeowners who prefer a non-permanent lighting solution.
- Battery-Powered: Battery-powered under cabinet lights are a wireless option, perfect for areas without easy access to electrical outlets. They are powered by rechargeable batteries, offering flexibility and portability.
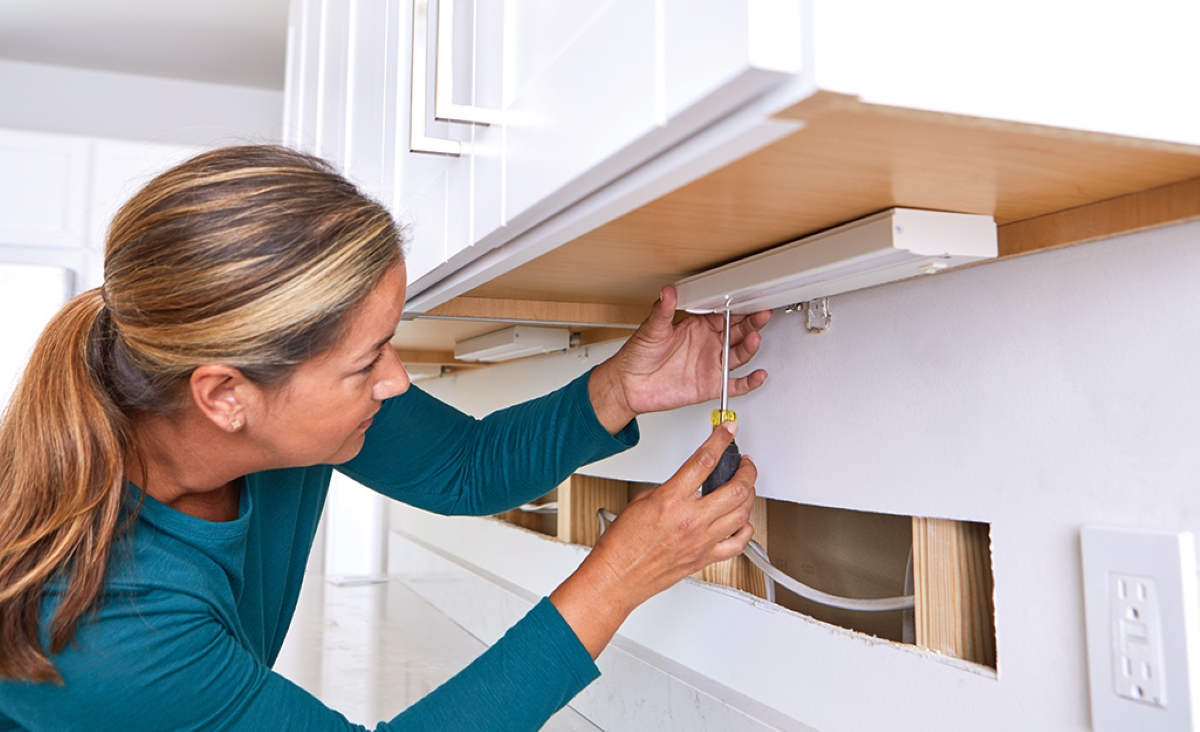
Direct Wire Installation: Juno Led Under Cabinet Lighting Direct Wire

Direct wiring your Juno LED under cabinet lighting provides a permanent and reliable solution, eliminating the need for batteries or plugs. This guide Artikels the necessary steps, tools, and wiring techniques for a successful installation.
Safety Precautions, Juno led under cabinet lighting direct wire
Before beginning any electrical work, it is crucial to prioritize safety. Always disconnect power to the circuit you are working on. Use appropriate personal protective equipment, such as insulated gloves and safety glasses. If you are unsure about any aspect of the installation, consult a qualified electrician.
Tools and Materials
To install your Juno LED under cabinet lighting with direct wiring, you will need the following tools and materials:
- Juno LED under cabinet lighting fixtures
- Wire strippers
- Voltage tester
- Wire connectors
- Screwdriver
- Level
- Drill (if necessary for mounting)
- Electrical tape
- Appropriate wire (14/2 or 12/2, depending on circuit amperage)
- Junction box (if needed)
- Wall plate (if needed)
Preparing the Wiring
The first step is to prepare the wiring for your under cabinet lighting. Locate the nearest electrical outlet or junction box. Turn off the power to the circuit you are working on. Use a voltage tester to confirm the power is off.
- Identify the circuit: Determine which circuit the outlet or junction box is on. Use a circuit breaker finder or consult your electrical panel.
- Locate the neutral and hot wires: In most electrical outlets, the neutral wire is white, and the hot wire is black. The ground wire is typically green or bare copper.
- Strip the wire ends: Use wire strippers to remove about ½ inch of insulation from the ends of the wires you will be connecting.
- Connect the wires: Connect the wires to the lighting fixture using wire connectors. Ensure the correct wires are connected to the corresponding terminals on the fixture.
Connecting the Lights
Now, you will connect the lighting fixtures to the electrical system.
- Connect the fixture to the wires: Connect the wires from the lighting fixture to the wires you prepared in the previous step. Ensure the correct wires are connected to the corresponding terminals on the fixture.
- Secure the wire connections: Use wire connectors to secure the connections between the wires and the fixture. Ensure the connectors are properly tightened.
- Mount the fixtures: Mount the lighting fixtures to the underside of your cabinets using the provided hardware. Ensure the fixtures are level and securely mounted.
- Turn on the power: Once the fixtures are mounted and the connections are secure, turn the power back on at the circuit breaker. Test the lights to ensure they are working properly.
Additional Considerations
For installations requiring longer wire runs, consider using a junction box to facilitate easier wiring and provide a safe connection point. If you are running the wiring through walls or ceilings, ensure you use appropriate conduit and secure the wiring to prevent damage.
Design and Placement Considerations
Juno led under cabinet lighting direct wire – Once you’ve successfully installed your Juno LED under cabinet lighting, it’s time to focus on the design and placement for optimal illumination and aesthetics. This step is crucial to ensure that your lighting not only provides sufficient brightness but also enhances the overall look and feel of your kitchen or bathroom.
Choosing the Right Length and Number of Lights
The length and number of lights you need depend on the size and configuration of your cabinets. Here are some helpful guidelines:
- Small Cabinets (less than 3 feet): A single 12-inch or 18-inch light strip is typically sufficient.
- Medium Cabinets (3-5 feet): Consider using two 12-inch or 18-inch light strips, or a single 24-inch or 36-inch light strip.
- Large Cabinets (over 5 feet): You might need two or more 24-inch or 36-inch light strips, or even a combination of different lengths to achieve even illumination.
Placement Strategies for Optimal Illumination and Aesthetics
The placement of your under cabinet lights plays a significant role in how effectively they illuminate your workspace and enhance the visual appeal of your space. Here are some key strategies:
- Even Spacing: Distribute your lights evenly along the underside of the cabinet to ensure consistent illumination across the entire work area.
- Consider Task Areas: Place lights directly above areas where you frequently perform tasks, such as the sink, stovetop, or countertop, to provide focused brightness.
- Avoid Shadows: Ensure the lights are positioned high enough to avoid casting shadows on your workspace, especially when using multiple light strips.
- Accentuate Features: Use under cabinet lights to highlight specific features, such as a decorative backsplash or a unique countertop material.
Sample Under Cabinet Lighting Layout
Let’s consider a sample under cabinet lighting layout for a typical kitchen. Imagine a kitchen with a 4-foot long countertop and a 3-foot long sink area. To create a balanced and functional lighting scheme, you could use the following layout:
- Countertop: Install a 24-inch light strip centered above the countertop, providing even illumination for food preparation and general tasks.
- Sink Area: Install a 12-inch light strip centered above the sink, providing focused brightness for dishwashing and other sink-related tasks.
Juno LED under cabinet lighting direct wire is a great way to add some extra light to your kitchen, but it can be a bit tricky to install. If you’re not sure how to do it, it’s always best to consult a professional.
But if you’re looking for a new place to install those lights, you might want to check out 1 bedroom apartments grand rapids. You might find the perfect spot for your new Juno LED under cabinet lighting! After all, a well-lit kitchen is essential for any home cook.
Juno LED under cabinet lighting, wired directly into your electrical system, can transform your kitchen, especially when paired with modern light wood cabinets. The clean lines of the cabinets and the bright, focused light from the Juno LEDs create a modern and inviting ambiance.
This combination elevates your kitchen’s style and functionality, making it a space you’ll love to spend time in.
